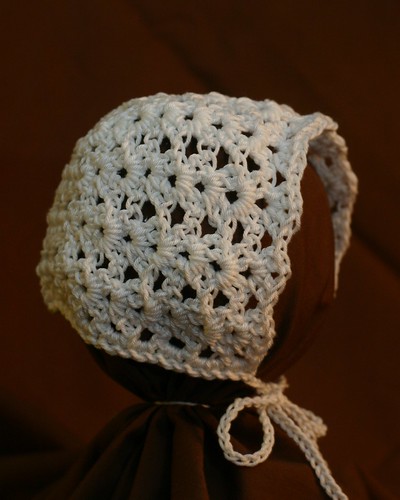
This little bonnet is for my sister's baby, who we are hoping will arrive by Easter (she'll be a day or so shy of 42 weeks by then). Maybe a little bonnet will provide some encouragement? I couldn't find what I wanted, so I just made this up. For once, I actually wrote it down as I went, so now I can share with you my very first pattern. It's pretty adaptable to your needs (different stitch patterns, different sizes)... it can't really be messed up if you just stick with the basic shape. Enjoy!
Baby Bonnet
Perfect for spring/Easter, Christenings, or just general cuteness. Written in American crochet terminology; convert as needed.
Materials:
1 skein (really just half a skein or so) Rowan cotton glace or similar yarn (this is 23 st per 4"/10 cm).
size F (3.75 mm) hook
Gauge:
Gauge is not critical for this project. Just add or remove repeats to reach desired size.
approximately 4 repeats of fan stitch (used in MAIN section) per 4" (10 cm)
8 rows of fan stitch per 4" (10 cm)
Size:
Finished bonnet has an approximately 15" (38 cm) circumference.
Approximately "newborn" size (or 0-3 mo, probably). It would be very easy to size up to suit your needs by making the rows longer and adding a few rows... nothing complicated here.
Construction:
Bonnet consists of (1) the MAIN section worked in a fan stitch, a rectangle that forms the sides and top of the bonnet (think wide headband), worked from back to front edge (brim); and (2) the BACK section, a square attached in the center back of the MAIN section, which covers the back of the head. This t-shape is then seamed along the sides of the back to form the bonnet shape.

Instructions:
MAIN section:
Ch 57 (or a multiple of 5 st + 2, as needed for desired size). Ch 2, turn.
Row 1 -- Skip 3 chs *in next ch [2 dc, ch 1, 2 dc], skip 4 ch*. Repeat from * to * across, ending with dc in last ch (having skipped only 3 ch). Ch 2, turn.
Row 2 -- Skip dcs *in ch-1 sp, [2 dc, ch 1, 2 dc], skip 4 dc*. Repeat from * to * across. After working last ch-1 sp, dc in turning ch (now abbreviated as "tch"). Ch 2, turn.
Rows 3-8 -- Repeat Row 2. On last row, omit final ch 2 and fasten off.
BACK section:
(The idea here is to work a square slightly less than 1/3 the width of MAIN section, centered along the starting chain edge. Adjust starting/ending points of the rows as needed if you have modified the size, and add enough rows to keep this section roughly square. I worked it in a modified open stitch, but you could just do rows of dc or the fan stitch from above or whatever is to your liking.)
At starting chain edge of MAIN section, join in ch-4 space that follows fourth fan. Ch 2.
Foundation row -- Dc in same ch-4 space *ch1, 2 dc in next "space"* 6 times, where "space" is alternately the ch in a fan center or a ch-4 space between fans, ending in ch-4 space that follows seventh fan. Ch 2, turn.
Row 1 -- Ch 1, dc in ch-1 sp. *Ch 2, dc in ch-1 sp* 5 times across the row. Ch 1, dc in tch. Ch 2, turn.
Row 2 -- Dc in ch-1 space, *ch1, 2 dc in ch-2 space* 6 times. Ch 2, turn.
Rows 3-6 -- Repeat Rows 1 and 2. On last row, omit final ch 2 and fasten off.
Finishing:
On both sides of the BACK section where it meets the MAIN section, slide the stitches along the ch-4 space in toward the center, thus "rounding out" the corners a bit. Sew the two sections together (technically, there is no right/wrong side, so choose what looks best). As you sew, keep the sections even for the first half or so of the seam, then ease in the extra length (if any) of the MAIN section as you complete the seam so the bottom edges are aligned (again, this helps give the crown of the bonnet a nice round shape, avoiding pointy corners at the crown of the head).
Join at bottom front edge of bonnet on either side. Sc around the bottom edge all the way around to the other front edge. A note about stitch placement: across the bottom edge of the fan stitch, place 2 sc in each tch space. As you stitch across back, hold in slightly to help shape bonnet (I placed 1 sc in each ch-1 sp and 1 sc between each pair of dc). When you reach front edge, ch 1 and turn. Sl st in each sc around.
Without fastening off (if you like, to save weaving in two more ends), ch for about 8" (20 cm) to create a tie. Cut yarn and attach at opposite front bottom edge. Ch an equal length to create second tie, and cut yarn.
Weave in all ends. Block as desired.

Update: Here she is! arrived just in time for Easter...
Please report any errors and feel free to ask questions by leaving a comment below.

8 comments:
Wow, Kristy, this is beautiful. I'm sure Julie and the baby will love it. What a nice heirloom to have. My great-aunt Nancy made Jeff a blanket, bonnet, dress and booties for his baptism. I loved having them for him and now Macy to wear. I'm hoping that they'll want their kids to weir them someday also. You must be busy with all your projects...I hope you're getting some rest also. :)
You've been featured!
http://smithalumblogs.wordpress.com/2008/03/12/spreading-the-word/
This is brilliant! I've been looking for a baby bonnet pattern schematic for a while. Thanks!
Carol said:
I have never made a bonnet like this . I tried it and loved it.. I have been looking for other patterns but this worked quite well Thank - You for posting this pattern..:)
carol, thanks for letting me know it worked well... i'm a novice pattern writer so i'm glad it made sense enough to someone else. :)
i made this for my niece's baptism. it was so fun to make and beautiful! here's a link to my ravelry page showing the results:http://www.ravelry.com/projects/feelandtriple/baby-bonnet
I love it! It looks very old fashioned-ish, but in the good way!
Beautiful for a keepsake! I am just finishing a christianing gown for a grandbaby girl in Central America.,And it is made with the same shell stitches as your pattern of bonnet.I am so happy I found it, thank you so much!
Post a Comment