in december after my father-in-law passed away, his home was soon filled beyond capacity with flowers (i say "beyond" as some of the arrangements fit only on the back patio.) over time, as the flowers began to wilt, i wanted to find some useful way to preserve them. years ago, i had heard about making rose petal beads, and rather than make jewelry of some sort, i decided to make a rosary for my mother-in-law.
i googled around and found several methods to make the beads. some options, like simply putting petals in a blender with water, didn't seem like they would produce a nice bead. i sort of combined the various instructions, and made up the rest. here's what i did:
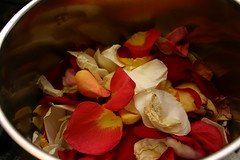
1. gather ye rosebuds
i had the mistaken impression that one needed piles and piles of petals. not true. i think a half dozen or dozen petals would be sufficient. you may choose to use all one color (red would be especially nice, yielding a mahogany color), or do as i did, mixing whatever rose petals you happen to have around. be sure to discard any brown petals. some suggest snipping off the fibrous bottom end of each petal, but i'm too lazy for such things. (not having a control group, i can't say whether it would have improved the results.) if you like, you can keep the petals fresh in a plastic bag in the fridge while you wait for subsequent flowers to hang their heads.
 2. cook your stinky porridge
 first of all, don't be fooled by instructions that say that cooking the petals will cause the aroma of roses to fill your house. rather, to my nose, it smells strongly of decay -- a combination of your valentine's bouquet in early march along with some rotting leaves. my husband swore it made his throat feel allergic, and hours later, the surprise was in jeopardy when my mother-in-law came home to a stinky house for which i had no explanation. it's not terrible, just not the most pleasing. you might want to open a window weather permitting.
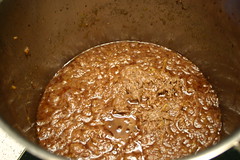 so: put your petals in a pot (something non-reactive, probably), cover with water, and heat. as soon as it boils, reduce to a simmer, and let it cook for a long time, stirring occasionally. i think i had mine on the stove for around 4-5 hrs, but if you're not cooking up many bouquets worth of petals, you might find a few hours is sufficient. basically, you're looking for the petals to have broken down into a a slimy brown mess, with no petals distinguishable from the others. it won't be a completely smooth paste, but the petals should be well broken down. see before and after (right) don't worry about the unpleasing color at this point.
3. remove the water
drain the whole mess in a colander or sieve. wait for it to cool enough so that you can handle the, um, solid matter (whatever it is now?). handful by handful, squeeze as much water as possible out of the stuff, and place in a container of some sort with a lid. the more water removed, the better. you can keep this "clay" covered in the fridge for several days if necessary.
4. shape your beads
you'll need some sort of drying assembly, including some way to keep the holes in the beads open. i used squares of corrugated cardboard and t-pins -- stick pins would be fine, but i liked the wider diameter of the t-pins, giving me more flexibility later in stringing the beads with bigger holes.
grab a (grape sized?) bit of the petal-gunk, and squeeze it in some absorbent cloth or paper to remove more residual water. pinch off a small bit and roll it between your fingers to form a ball (or whatever shape you like), making it as smooth as possible. carefully insert a t-pin, slide the bead halfway up, and stick the end of the pin into the cardboard. two things to be aware of: first, the bead will shrink a good amount -- i'd guess maybe 30% or so? so make the bead larger than you want the finished bead to end up. second, it will not shrink uniformly -- it shrinks more in width than it does in height (perhaps due to friction along the pin shaft?). my beads started off mostly round and ended up oval; my (unused) set of oval beads ended up very long and thin, almost like a stout bugle bead. you might find it to your advantage to make all the beads at once -- once they begin to dry/shrink, it's more difficult to keep them a consistent size.
5. wait. repeat.
let your beads dry, spinning them half a turn on the pins every day or so if you think of it (i doubt this is crucial). it's probably best that they be in a moderate temperature and not overly humid environment, so that they will dry before they grow mold. i had no trouble with this, they dried to the touch overnight, and continued to dry (and shrink) for another day or so. (be aware: they will still shrink a slight amount for up to a week or two after you make them, so if you don't want any gaps in your necklace, wait longer to string them up.
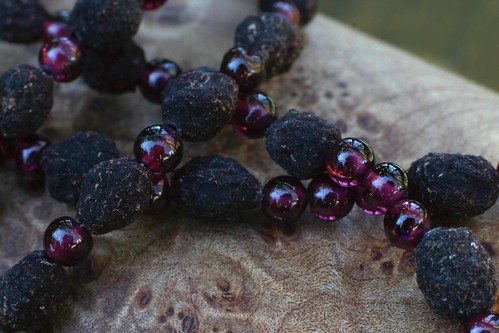
the results: you probably weren't fond of the color of the cooked petal goo -- mine was reminiscent of some unpleasant baby-offerings of which i'd rather not be reminded -- but surprise! the color now is much improved. mine (from a mix of rose petal colors, with red in the slight majority) went from an ugly tan to a lovely dark brown with a deep purple undertone. the texture becomes a bit more rough after the beads dry; i chose to view this as part of their inherent natural beauty rather than get concerned about it. it's also worth noting that some people recommend coating the beads with some sort of varnish, wax, etc. i chose to leave mine natural as i liked their look (and the oil from your hands supposedly enhances the beads over time), but you could research different options. (oh, and the foul smell goes away as they dry as well. luckily.)
6. create something useful and/or beautiful from your beads
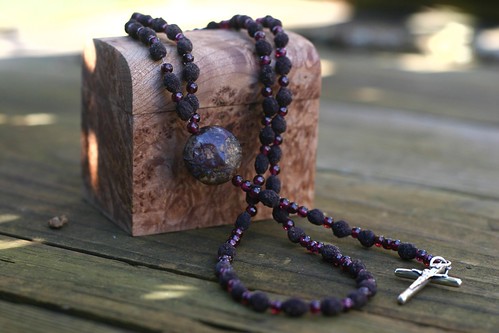
you could easily make a necklace, bracelet, or earrings, or incorporate the beads into sewn or crocheted items (keeping in mind it's best to store the beads in a non-humid environment if possible). i chose to make a rosary for the meaning it would impart give the source of these particular petals. (i had to look up the proper configuration of a rosary, and i used a few standard variations: rather than use small ave beads and large pater beads, i just put more space around the pater beads to set them off. also, i couldn't find a pendant i liked, so i used a large stone bead for the center, plus a sterling silver crucifix for the end.)
string the beads on whatever size beading wire fits comfortably through your beads, interspersing (or not) some other beads for variety and interest. (i used some garnet colored glass beads to pick up the mahogany tones in the rose petal beads.) for the rosary, i didn't need a standard clasp (just silver crimp beads to secure the ends), but choose whatever style clasp works for your needs.
stored (generally) in an airtight container, and not, say, dropped in the swimming pool, these beads should last indefinitely. (or so i'm told... we'll see, eh?)
and there you have it. a lovely keepsake, especially meaningful if you used rose petals that had some meaning to start with. (valentine's day is coming up -- are any of you the type of person to get roses then? if not -- i'm not either -- or you just don't want to wait, the cheapest way to get petals is to ask for some (specify you'd take the wilty sad looking ones!) at a flower shop. they'll either just hand them over, or sell them for not much.
as for this particular rosary, its meaning tends toward the somber rather than other potential meanings, such as celebratory or romantic. however, although it could be seen as too sad and morbid to make something from funeral roses, i choose to view it differently. those flowers were given not only in sorrow, but also as a sign of the love and respect the givers had for my father-in-law. it's this -- the profound effect he had on the lives of others -- that i see symbolized in the rose petal beads. an unworthy tribute, to be sure, but meaningful nonetheless.

16 comments:
Thanks for this, I can make use of the left over roses my friend gave me over the weekend.
I have some that were owned by my great grandmother, and they're still in great shape. Must have been pink originally, because they are sort of a darkish fuschiaish color. Maybe dyed white ones, though. Who knows, that was over 100 years ago. But just so you know, they last!
What a special idea for your MIL. :)
Wow, how cool that you have heirloom rose petal beads -- just think of those 100 year old flowers! Glad to know they really do last... Thanks.
I am so thankful for your article. I have a beautiful necklace that my great-grandmother made. My mother just gave it to me for my birthday in May. There a such a unique and special thing to have...and as we were explaining about them........some people didn't believe that they were really made from roses!! I asked a friend of mine where I would be able to find the information. She suggested to look up rosary beads. Through searching in that area I found you!! I thank you so much and I am so glad that you included how to make them. Thank-you! stevensagain@gmail.com
Hi Kristy, Thank-you so much for the information and recipe to make these beads. My mother just gave me my great-grandmother's necklace that was made from rose petals. When showing them to someone they couldn't believe how they were made and that they were in such good shape! They have darkened also, but are really pretty. She had put tiny gold beads inbetween. I thank you so much for this article. Because of a friend's advise I started looking in the rosary bead area and found you! Thanks, Diane
Your pictures and detailed information is outstanding. I have never made petal beads using this recipe, but I hope to find the time to try it one of these days.
Thanks!
Thank you for the excellent instructions! My friend and I discovered the old necklace she got from her grandmother wasn't really a rose petal necklace after all but carved plaster.
I am planning to write a blog post about this and would love to link to your tutorial. May I use a photo of your lovely necklace too? Thanks, Pearl
Pearl -- Sure, feel free to use the photos, just please link back to this post. And I'll look out for your post (or come back and let us know where it is...:)
Hmmm, I wrote a message, but something did not happen. Your lovely Rosary inspired me. Last April, I began to make rose petal jewelry. I have modified my recipe some from yours and I simmer them a lot longer. I would love to hear from you at katharinewlkr@gmail.com, if you would care to see any photos of my jewelry, which includes Rosaries. I have a Rosary that is about 75 years old, made of rose petals. O have just completed making a Rosary for my priest. (Not that he needs one, but he does not have a role petal one.) Thanks for your inspiration, Katharine
I added some finely chopped vanilla bean to my rose petals while they were cooking and I found that the vanilla overpowered the smell of the roses and made it, if not nice, at least bearable.
I love the turorial, but still have a quick question: how big of a ball are you forming from the paste? (*How big is that grape we're talking about?) I am at that point, but don't want to mess up....I've come this far! Thanks!
Dawn --
Re-reading the instructions, I see the confusion (I should have written that part more carefully).
What I mean to say is grab bit of the goo (any size will do really, I just found it convenient to do a "grape-sized" chunk at a time) and squeeze that extra-dry. Then from that squeezed ball, take what you need to form a bead, and it might make 2 or 5 beads, depending what size you make.
They do shrink (I said 30%, but I don't quite remember any more, so we'll assume that's right :). My finished beads are about 1/4", so they started out a bit bigger than that, like 3/8" or some such thing.
The truth is, it's a bit of a guessing game. If you're like me, you've made far more goo than you'll really need, and in that case you can always give it another go if things go horribly wrong. But so long as you're not tied to some *exact* bead size, you should be fine.
Kristy and Dawn, Somehow, Dawn's question got to me and since I also have a tutorial, which I have not yet published, I sent Dawn (I hope) a photo. The newly rolled ball is about 13 mm across. They do shrink by about a third while drying. If anyone wants to ask me more, I can be reached at katharinewlkr@gmail.com
Kristy, when I get ready to publish my tutorial, I shall communicate with you a I want to give credit to yours. You got me started and I have loved every minute of it. Katharine Walker
Thanks. I will let you know how it comes out!
I been a florrist for 30 yrs and just got laid off, I have made many casket blankets using roses, and was always interested in making rosary beads out of the blanket. I heard the nuns used to make them, I've been on the internet doing research, and right now my roses are simming, a little nervous about shaping them. Thanks for the informatiom. Elaine
Very cool! I'm looking forward to trying this out :) If you need rosary parts, http://www.rosaryparts.com/ is a great website. I get most, if not all, of my centerpieces and crucefixes there.
Post a Comment