
last week i finally finished up this quilt for my sister's (due any day) baby girl. i actually began this quilt two years ago: i made the same style top for a friend's baby, and wasn't terribly confident on how many strips etc i'd need. it soon became clear (before even sewing anything) that i had enough for two quilts, so i did both tops at once. (economies of scale! hurray!). i knew at the time the second quilt would ultimately be for my sister's future baby girl -- and if she happened to have only boys, someone else would be the lucky recipient.
given the quilt was started two years ago (i vividly remember shopping for fabrics at a local quilt store with my now-toddler then-wee-squirmy-babe bouncing around in a sling), some savvy fabric types will recognize a few amy butler prints from an older collection, including the large-scale floral on the quilt back. it's a little time capsule of a project, isn't it? i will say, one of the fabrics (the lavender one with little white dots) caused no end of trouble, since it was a more open weave for some reason and thus stretched more and refused to line up. now i know: if i ever encounter a suspicious fabric like that in the future, i'll just fuse interfacing to it before i begin cutting to keep it in line.
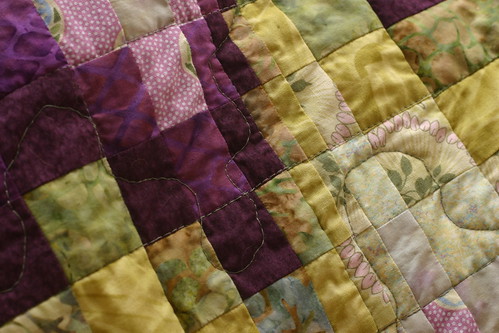
i chose this design since i was always intrigued by bargello style quilts. they're not as hard as they seem -- sure, there are so many tiny little squares (528 in this crib-sized quilt), but the whole thing is quite orderly once you get going. the basic method is this: you piece equal-width strips (say 2") that run the width of your quilt (include extra for dozens of seam allowances). fabrics should run light to dark of two colorways to maximize the effect, and just repeat those 8 or so fabrics until you get the desired height of the quilt (i did three repeats for 24 rows). now cut strips the opposite direction (creating column strips), varying the width from as little as 1" up to around 4". make every strip into a ring by joining the ends, then lay it all out and decide how you want to place everything. the fabrics should shift up or down one "square" as you move across the rows, creating the effect (sort of like a stock market graph to my eye). strategic placement of wide or narrow strips give you a more extreme or gentle slope to your "graph" pattern. once you have it all figured out, decide which row of squares will be the top of your quilt and use a seam ripper to open up your rings above that row. number your strips all at the top or all at the bottom edge, then sew together. this sounds confusing but i promise it isn't; if anyone has questions or wants more info please just leave a comment and i'll do my best to help.
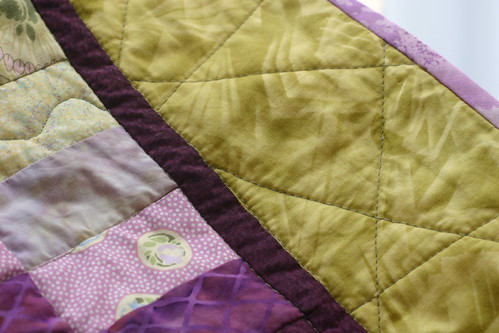
this was my first real attempt at free motion quilting, so i didn't attempt anything too elaborate. i did a curvy swirl of sorts that roughly tracks the darkest and lightest fabrics as they move up and down in the bargello pattern. my stitch length isn't the most consistent, but i overcame my fear of "ruining" a quilt by subjecting it to my novice free-motion skills, so that in itself is an accomplishment. i filled in with some in-the-ditch quilting every 3" or so to keep the cotton batting from bunching up, and on the border, i did some randomly angled lines, sort of reflecting the art deco feel in the border fabric (and contrasting the hard angles with the curvy quilting in the center section). i like the overall effect, and the quilting is all pretty subtle anyway since i used a blend-in beige thread (wimp!).
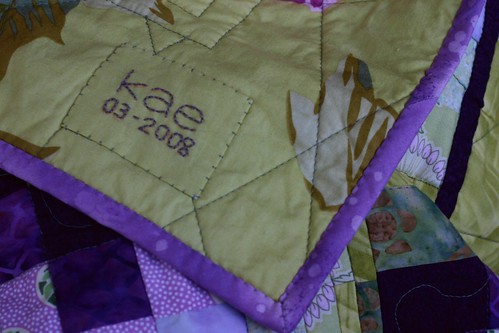
i believe strongly in the idea of signing one's quilt (because you never know what will become an heirloom, and your great-grandchildren might want to know who made the quilt and just how old it is -- my family has some generations-old crocheted lace socks that have an old tag pinned to them indicating they are "60 years old"... not so helpful to us now). so, i always plan to include a patch on the back with lots of great info on it... but then i can never think what it should say! in this case, i don't yet know the baby's name, so i couldn't list the recipient, and everything else i could think of beyond my initials and the date seemed like fluff -- or just a lot to embroider. (anyone want to share what they put on quilt labels? favorite methods?) so this label is my little bit of hand-stitching on a machine pieced and quilted project. i also secretly enjoy doing all the tiny even little stitches required to secure the bias binding to the back of the quilt -- so maybe i should contemplate doing a future quilt without the machine for once? then again, just the hand stitching part of the binding took four hours, so i'd need to prepare myself for a very distant completion date if i did it all by hand.
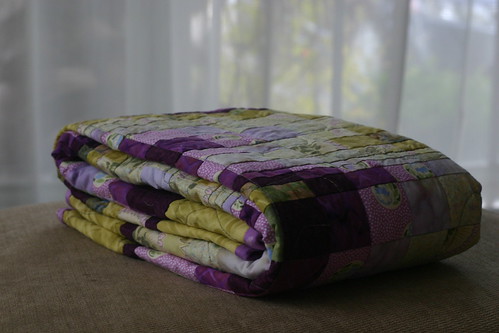
so there it is. julie seems pleased, and i'm sure the baby will like it. (babies are traditionally easy to please like that. it can get more difficult later when they develop an aversion to everything that isn't, for example, entirely purple. but the babies are just pure love.) off to put notes on the photos, so click through to flickr if you want more tidbits of information.
2 comments:
The color on that quilt is beautiful! The plumish purples light and dark fading into that rich olive green. I love it!
I love your unusual colors, too. I generally embroider the baby's name and date of birth, and my initials. If the quilt is given before the birth, the label is added later, when I go to see the baby. I love when friends introduce me to their kids as "the lady who made your blanky." Satin binding makes kids love them more. I made a queen sized bargello quilt for my sister's wedding 10 years ago, and today, as I start the quilt for her firstborn, I found the scraps! So it'll be the same fabric sequence with a pattern like yours. Thanks for posting it!
Post a Comment