Friday, February 22, 2008
back soon
i'll be taking a short break from posting because unfortunately i'm stuck on bed rest for the time being and only have energy for short bursts at the computer. i have several things i'd like to post, but they'll just have to wait until i'm running at full speed again, as frustrated as that makes me. i just wanted to say please do check back; i promise i'm not going to be inactive forever. thanks!
Wednesday, February 13, 2008
valentine
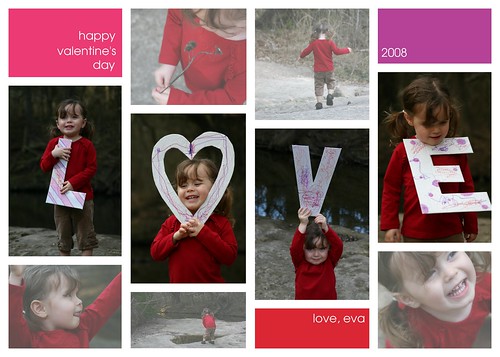
as a romantic holiday, i don't get very wrapped up in valentine's day. however, i am starting to see the appeal when it comes to kids. eva's really excited to exchange valentines with her friends at a little party we're having for them. we've been working on these two projects for a couple weeks (amazing! i started with time to spare!), and she seems to think it's the best thing since christmas.
for the photo collage, she helped me make the letters. (glue sticks and coloring? perfect kid craft!) we used cardboard from a shipping box, covered the cut-out letters with packing paper from said box, and decorated away. despite the inherent glue & markers appeal, she actually wasn't into it at first, but then i caught her in a better mood another day. it pays to be patient; something i so rarely remember.
then she agreed to pose for all those photos, which was key (a collage of scowls doesn't say "love" in quite the same way, does it?). we stumbled upon the perfect setting, a nice monochrome winter outdoor sort of thing, which i think adds to the effect. also, dogs and bikes kept passing by, so she was suitably entertained. then i just smashed it all together in the gimp (like photoshop but open source and free).

we also made these hearts to mail or pass out to our family and friends, inspired by the very cute "colorful heart bough" (item #3) in kid craft weekly's valentine's day issue. rather than tape smaller hearts to a bough (which doesn't fit in an envelope the same way, so didn't suit our long-distance needs), we made larger hearts and added a bit of yarn with which to hang them. like the "love" letters above, the hearts were made almost entirely from packaging detritus -- we used the brown mailing paper that had wrapped a box mailed to me, made a heart stencil from leftover cardboard, and decorated all with tissue paper that had wrapped my recent birthday presents (it pays to have a february birthday, i guess. my gifts -- including a bouquet of flowers -- came in red, purple, pinks, and white. how convenient! i didn't even have time to put it away and pull it all back out again.)
eva glued ripped up tissue paper to the brown mailing paper, then i traced and cut out hearts. (again, she wasn't that into it at first -- but ripping paper and using glue are your favorite things! i don't get what the issue could be. that is, until my mom so astutely pointed out: "she's two." oh yeah, that's what it is! i forget that sometimes...) i taped scrap yarn to the back, then covered the backs with one heart-shaped piece of tissue paper -- those were easy to cut out once i figured out to fold the paper to the right size in big stacks, place the stencil on top, and cut through a dozen or so at a time with the rotary cutter. (we made about 30 hearts total.)
despite her occasional reticence, eva's really proud of her valentines and can't wait to share them. i do enjoy mailing out valentines (under the pretense of their being from eva, even when she was a baby and we made footprint cards by repeatedly painting her little foot). i think that it makes more sense for me to do this than holiday cards in december. i'm too busy then, and plus the odds of your card ending up in a huge pile of similar cards is lower at valentine's day than in december. and who doesn't like a surprise valentine? (note how i make the slacker method sound so well planned out?)
so, happy valentine's day, everyone, in whatever way you view it (as a holiday it's a bit loaded, isn't it?) and, if you're against it in every way, happy early fifteenth of february, then. :)
Saturday, February 9, 2008
she sews
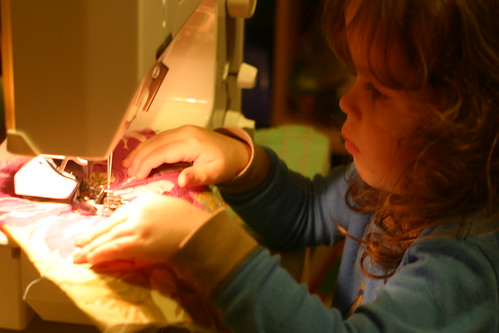
although (most?) parents try not to push their own identities onto their children, i think it's probably normal to be a bit excited when your child takes an interest in one of your favorite activities. so imagine my pleasure when eva became fascinated with the sewing machine, and wanted to have one set up just for her.
it never would have occurred to me to try this at such a young age (she's 2 1/2) if i hadn't just read wendi gratz's great post about sewing with children (i found it via whip up during their crafts with kids theme last month). she mentions her daughter starting at age four, so i asked larry first if this seemed like an okay plan for our kid or if i was going to end up being harshly questioned when we ended up in the ER with puncture wounds in my toddler's fingers ("gee, but she really wanted to sew...")
like wendi, i set my machine up on a kid-sized table, put on the walking foot (which blocks the needle a bit more), and wedged some stuff under the foot pedal so she couldn't sew too quickly. i also ended up duct taping the foot pedal to an overturned box since her feet don't reach the floor even from her kid-sized chair.
i made sure she knew to keep her hands on either side away from the needle, and let her just go. i thought she'd just want to sew random lines (i gave her a scrap quilt sandwich to work on), but within two minutes she insisted she raise and lower the presser foot herself. (from my vantage at the side of the machine, seeing her little hand reach to the back to find the hidden presser foot lever was just too cute.) we couldn't find her scissors, so i taught her to cut the threads with the cutter attached to the side of the machine. our biggest challenge was that she insisted on "fixing" the various knobs for me, and every so often i'd find the thread tension had been set to zero when i wasn't paying attention. as she sewed, the look of concentration on her face was sweet, and she'd proudly show me after she finished each line: "mama, look at my beautiful stitching!"
so far that was her only sewing session, but when she seems ready, i'll see if she's interested in following a line or seam. maybe i can help her make a simple little bag, since she's fond of them in general.
of course, she'll eventually rebel against me and everything i stand for, but for now she wants to sew just like mama. it made my day.
Wednesday, February 6, 2008
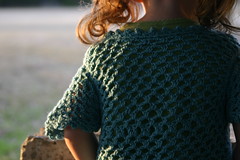
crocheted toddler sweater
i ignored this blog for a good chunk of last year due to our ceaseless travel (eva now has more frequent flier miles than i had when i was about 20 years older than her two-and-a-half years). given that, i'm catching up on some of the travel-friendly crafts that kept me busy over those months in 2007.
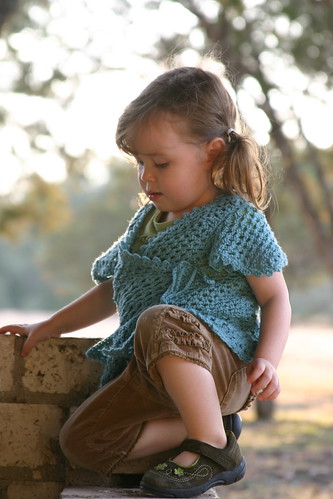
this little item was my first attempt at crocheted clothing of any kind. i made it during our month visiting my parents in alaska over the summer, with most of it done while sitting in a camping chair next to some river or another. maybe that's why i like the result so much; it has that energy put into it? or, equally plausible, is simply that it's a great yarn -- wool bam boo, a 50% wool 50% bamboo yarn from classic elite yarns. it's really soft and drapes well (as the label goes ahead and tells you it will), and was easy to work with as a beginner. i like that it was something other than cotton that she can actually wear for more than two months out of the year in our texas climate. the open/lacy design combined with just a bit of wool means it can keep the chill off when needed, but not make her too hot the rest of the time.
 back then, before i knew if i was going to like crochet enough to invest in some books, i sought out a free pattern -- it didn't take me long to discover that a great many yarn manufacturers have free patterns on their websites. they're not always the most unique or inspired (especially from some of the more mainstream companies, ahem), but a good starting point for a beginning crocheter. i used this pattern from lion brand yarn. i know more places to look for patterns now, but i'm sort of glad i didn't at the time or i wouldn't have stumbled upon and made this sweater, which eva and i both love.
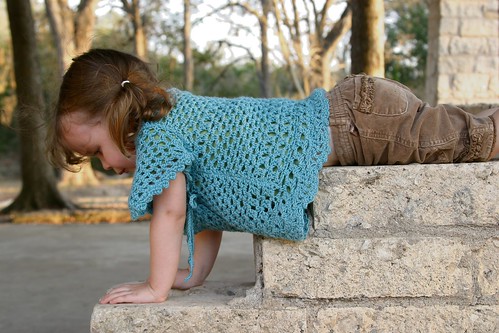
halfway through i began to fear that she would grow out of it too quickly (turns out she doesn't grow very fast... hurray?). since it's a wrap style, i really only had to worry about the length, so i added an extra row (or two?) of the edging pattern right above the bottom scallops (there's a note showing exactly where if you click on the above photo). i think the extra bit of length helped, and how could it hurt? it blends right in, only apparent should someone compare it to the original pattern. (and should someone do that and actually care, i'd be a bit more concerned about their mental state than i would about the sweater.) so when in doubt, i say, go ahead and size up a bit when you're talking about children's clothing, even if that means adjusting as you go.
 it was all pretty straightforward, though i had some trouble with the sleeves. looking at the sample photo with the original pattern, clearly my sleeves came out too short? i found the instructions for that section ambiguous (though now i can't remember why), and redid the sleeve a couple times, as i reinterpreted the pattern (i attribute the confusion to my beginner status). actually, the sleeve ended up too short in both directions, requiring me to ease in a bit too much around the shoulder, probably because my starting chain for the sleeve was too tight (which i now know to be a common beginner mistake -- going up a hook size just for the chain can remedy that if you have the same problem). the lesson for me here is that garment construction still follows largely the same rules, be it in yarn or fabric. had i trusted my instinct (and knowledge from sewing) that the sleeve wasn't fitting, i could have easily fixed it, but "that's what the pattern said" (as best i could tell), so i left it alone. as a result the sleeves are a bit off, but no matter. now i know.
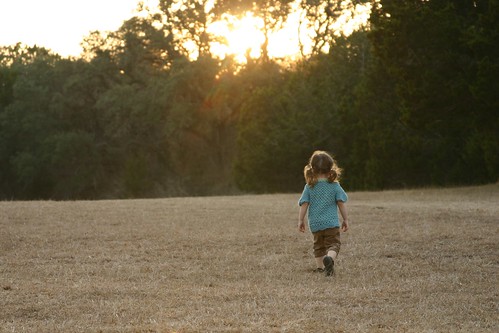
eva was kind enough to model her sweater for us on a recent spring-like day. (it's early february! see why we can't wear so much wool around here? by march wool-wearing is long in the past, and we start swimming. which, as a former northerner, i know sounds great -- until it's july and you already don't know how you'll ever make it until the reprieve of october. so, it's a trade off. not that i'm missing the snow right now.) we had fun taking photos -- though she never stopped moving for even two seconds -- and then she decided it was time to hike back to the playground. when it comes to toddler photography, shots like the one below are how you know you are done. "come on mama. are you coming? stop taking pictures and come with me!"
Sunday, February 3, 2008
digitally created silhouettes

I love silhouettes. My husband has one his preschool teacher made of him when he was about four, using the now old-fashioned method (which I presume was ultra new-fashioned at the time): she used an overhead projector to cast a focused shadow of him on the wall, where a piece of black construction paper was waiting. He (I can only guess) was a very patient preschooler and stood mostly still while she traced with a pencil, then later cut out the silhouette and glued it to a background piece of paper.

I can see the appeal of that method, I really can. Or better yet (given that my impatient toddler is not yet a relatively patient preschooler), I thought I might trace around a photo. However, based on my love of messing around with image manipulation software and my lack of a really solid pair of left-handed scissors (or confidence in my xacto skills), I decided to do it digitally. I concede, it might lose some of the charm this way, but nonetheless the method suits my needs. If you are similarly inclined, here's the method I used. (Note that this particular digital method preserves the hand-drawn nature of the older methods; I tried to generate an automatic selection through a series of adjustments to curves and thresholds and fuzzy selections, but try as I might, the results were choppy and unnatural looking. For me, (digitally) hand tracing the outline proved faster overall and produced a more friendly result.)
Take your photo
 Photograph your subject in profile, framing tightly (say, from the bottom of the neck up). As much as possible, make sure your subject is in full profile and not somewhat turned toward or away from you. Also, it is best if the camera is level with the person's head so that you don't get a funny high or low angle. More than you would expect, the expression comes through in the finished silhouette, so aim for a natural expression rather than a scowl (produced, perhaps, by a somewhat uncooperative model's exasperation with your need for one more shot). Bonus points if you can find a contrasting background -- if you have black hair like I do, a white background would be preferable to the background of dark trees I managed to put behind myself.
Prepare the image
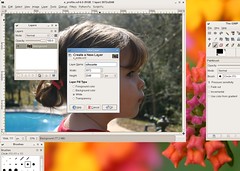 + Open the image in a photo manipulation program (I use the GIMP which is open source and freely available; Photoshop would also work. You know... I hear it's a good product, too.)
+ In your Layer dialog, add an alpha channel to the background (and only) layer.
+ Add a new layer, selecting "white" as the fill type (I called mine "silhouette"). Move that layer down, so that it is below the photo layer. This is the layer on which you will draw the black silhouette.
+ Change the opacity of the photo layer to something around 65% (adjust to your liking). This enables you to see the photo and what you are drawing on the silhouette layer at the same time. Handy.
Outline the silhouette
+ Select your brush -- I used the 11 pixel circle, but you could go smaller if you wanted finer details; just don't use one of the fuzzy circles. Make sure you drawing (foreground) color is black.
+ Zoom in on the image so you'll have better control over your pen. (In the GIMP, you just hit "+". I'm sure most of this stuff is the same or very similar in Photoshop, but I haven't used that in a while and can't remember exactly.)
+ In the Layer dialog, make sure you are on the silhouette layer (so you don't draw right on your photo). In fact, stay on this layer for the duration; the photo will only be used as a visual guide.
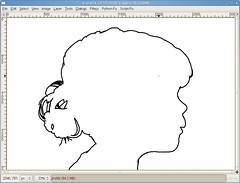
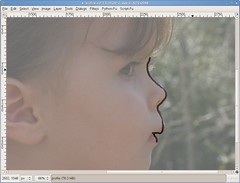 + Begin to outline the silhouette of your subject using the basic drawing tool. Keep in mind that you want to keep the entire width of your pen inside the profile (unless you want a slightly extra large nose or forehead). Tip: Rather than draw in one continuous line, you may find it helpful to draw in shorter strokes (just pause and let off your mouse button once in a while as you draw). That way, if you go slightly off course, you can just hit "undo" to remove a short bit of errant drawing, rather than have to pull out the eraser or redo a long line.
+ To check your progress as you go along, just turn off the photo layer and you'll see your black lines on the white silhouette layer. This way, you can get an idea of exactly how much detail (say, on the hair) you'd like to include.
Fill in the outline
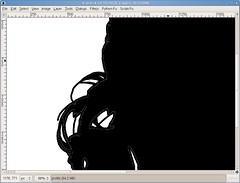 + You can try to use the bucket fill tool at this point to fill the area inside your outline. However, you may find that you end up with a little halo of white dots between your black outline and your black filled area (see right, click to see larger photo -- those dots are small). To avoid that, try this little trick:
+ Undo your bucket fill. Select the fuzzy selection tool, and click on the white area inside your outline to select that area. Before filling the area, you need to "grow" your selection so that that ring of white dots is included in the selection and thus will get covered up when you fill. To do this in the GIMP, under the "select" menu, choose "grow". In the dialog box, specify the number of pixels by which it should grow -- just enter something smaller than the diameter of the brush you used (my brush was 11, so I entered 7).
+ In the bucket fill dialog, select "fill whole selection" rather than "fill similar colors" so that it uses your fancy new selection when filling. Now you're ready to fill your outline. Hurray! A nice clean silhouette.
Tidy up and finish
+ Now is a good time to clean up any rough edges and refine the details. I found it helpful to change my drawing color to white and "shave" off any shaky bits that look untidy. Pay special attention around the facial profile; subtle differences (such as a slightly errant tracing of the curve of the nose) can affect the resemblance of the silhouette to your subject. Also, you can add or remove details as needed. (I always need to adjust a bit on the hairstyles. Not unlike real life.)
+ Rather than have the neck/shoulders continue all the way to the image's bottom edge, you may want to trim it at a nice jaunty angle, like traditional silhouettes. Just draw a white line at the angle you like (note: holding down shift constrains the pen to a straight line). Then, do the fuzzy select/grow the selection/bucket fill trick we used above (this time filling in white) to cleanly remove the, well, body from the head. (Ouch.)
Your silhouette would be lovely framed alone or in a set with other individually framed silhouettes. If you'd like to do a couple or family grouping in one print (so your silhouettes can chat with each other?), just create a new image with a white background large enough to hold all your silhouettes and copy/paste the individual silhouettes into it. I like to make all the silhouettes the same height -- all the better to compare the wacky differences in proportion of child and adult faces -- so before merging the images into one, scale each accordingly. Tip: crop each image so that the top and bottom of the silhouette precisely touch the image boundary. Now just scale each image to the height you want (say, the height of the smallest of your silhouettes), and they'll all be perfectly the same.
(Click on any photo for a larger version; the details are hard to see at this size.)
And there you have it, some lovely silhouettes to save for posterity. It would be interesting to do a silhouette of a child each year or so as they grow and their profile changes (okay, let's see if I can remember to do that...) If you know of clever uses for silhouettes, I'd love to hear them -- maybe embed wee tiny faces into resin buttons or something? In the mean time, I'll consider it a success if I remember to print and frame a more tangible version of these digital silhouettes. (Oh, the follow-through!)
Friday, February 1, 2008
crocheted slippers (and a lesson learned)
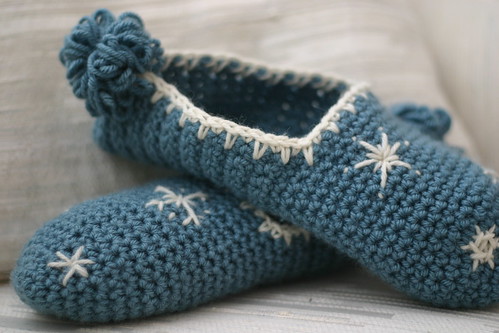
i crocheted these slippers for my sister-not-quite-in-law (my brother-in-law's long-time girlfriend... there's no convenient term for that, is there?) for christmas. i rather like how they turned out, a bit retro, a little seasonal, not too hokey, and they used up exactly the amount of yarn i had left over in that skein of vanna's choice lion brand yarn (say what you will about acrylic yarn, you have to admit vanna or her people can really pick colors -- that's what drew me in).
but here's the thing: i didn't really use a pattern, and didn't write down what i did. so, even if i like them, i can't ever make them again. oops.
life lesson #8295: write things down. and not on a postage-stamp sized scraps of paper that you found in the bottom of your purse, which you then shove into the pages of one of your craft books and subsequently can't find.
i started with a pattern, but didn't like the choices they were making, so from the very first row i started changing things. then, before long, i wasn't even looking at the pattern anymore and was just winging it. (other than the basic "it looks like a slipper", ultimately no measurements or stitch patterns were kept from the original pattern). knowing that slippers in a pair tend to want to be the same size as each other and look, well, alike, i did jot down random things like "inc 2 each side & 1 bot for 3 rnds then 2 more next 2 rnds". it worked well enough when i made the second slipper the next day and could remember what i did, but wow, that's not terribly helpful not even two months later. what did all that illegible stuff even mean? who made these slippers again? some mildly deranged woman (or talented monkey?) with free access to an (unspecified size) crochet hook but strictly limited access to office products?
so, i'd love to be able to tell you how i made these, but i can't. here's one cool tip i can share, though:
i didn't know her exact size (i knew she was maybe a size or so up from me, but that level of knowledge only takes you so far), so how big to make the slippers? my solution was to err on the side of caution and make them a row or two longer than i thought i might need (the back of the slipper is a straight seam; the last row of sc is folded in half and just stitched together). turns out i was right, and they were just a bit too long, but no matter. i left the pompom unattached until i had her try them on, pinched at the back of her ankle to determine how much needed to be "taken in", then attached the pompom at that point, keeping the slipper pinched together the proper amount. this accomplished two things: i effectively shortened the slipper, and i also added a bit of contouring to the heel area. rather than a straight up-and-down fit along the back, the shape comes in above the heel (at the achilles' tendon), helping the slipper to stay on the foot a bit. to be frank, this trick was the entire motivation for the pompom in the first place -- it creates and also hides the after-the-fact sizing/shaping.
i plan to start using patterns less often and to start "designing" (read: randomly making stuff up as i go along) more often. note to self: start using that notebook you made yourself and write things down!
Subscribe to:
Comments (Atom)