while julie was here, i dyed eggs using natural dyes, something i'd never done before. a reasonable thing to do would be to try three or four colors, so i decided on ten.
along with the several cups of vegetables or a few tablespoons of spices, i added 1-2 T vinegar along with 1/4 tsp alum per cup of water. i'm sure the vinegar helped, and while the alum didn't always make a difference, in the cases where it helped, it was key. for example, red cabbage dyed the eggs a barely-preceptible faint pink, but after adding the alum, the water instantly turned deep bluish-purple, and the eggs took a lot of color very quickly. basically, i brought to a boil then simmered each pot for 15 minutes, then dyed and hard-boiled the eggs at the same time by simmering for 15+ minutes. if i thought the egg could use more color, i switched to the "cold" method, and let it soak in strained dye in a glass for a good long while. (i have no intention of eating the eggs, so i didn't worry that they became overcooked, took on weird flavors, or sat out of the fridge in dyes for a long time.)
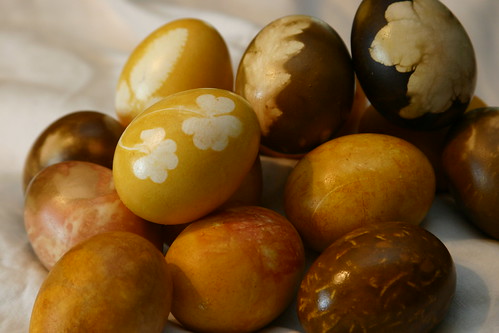
the best dye of all was onion skins -- i used yellow and red onions, and to get a good number of skins, i rifled through the bins of onions at HEB collecting skins -- while eva patiently looked on -- to go with my modest onion purchase. (this didn't phase the cashier at all, causing me to wonder what sorts of things stranger than bags of onion skins they see in a day?) yellow onion skins resulted in beautiful eggs a bright golden yellow color (almost indistinguishible from the tumeric eggs, actually). an egg directly wrapped in yellow onion skins came out yellow with rust colored patches. red onion skins created some deep olive green eggs, one left in too long was nearly black (with a white flower). one egg wrapped tightly with red onion skins came out pink and a paler shade of olive green. nice.
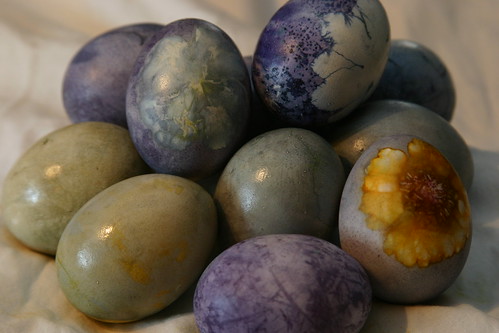
onions and red cabbage were the best, but i also had success with beets (brick red, but only after soaking for several hours -- before that, a displeasing brown, alum or not), tumeric (very similar to yellow onions but less dappled and more likely to stain everything), and hibiscus tea. i expected the tea to result in purple or blue eggs, but instead got a sage green, both with and without alum, but darker with). very unexpected. i also had a few disappointments -- spinach barely colored the eggs at all -- even after i tossed in some fennel fronds for good measure, and cumin created not an orange-brown, but just plain brown -- even after i added some cinnamon just in case. coffee also did little but lightly stain the egg. however, imagine the confusing smell at this point: tumeric, cumin, cinnamon, fennel, onions, coffee, and cabbage... yum! (??)
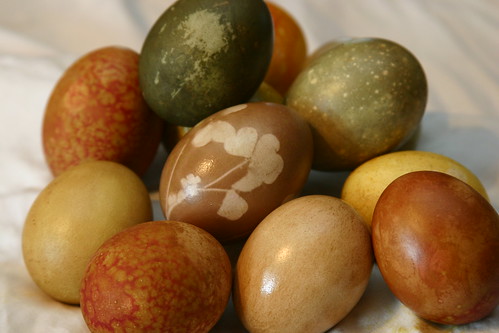
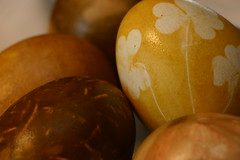 i also tried some special techniques, with varying degrees of success. i tried layering the colors, but one tended to overwhelm the other regardless of the ordering. i put oil in some of the cold dye, resulting in some interesting brown-and-red spotted beet eggs, which seem to come from some seussian bird creature. i rubber-banded onion skins directly to eggs as mentioned above, yeilding a sort of tie-dyed effect. but by far the best technique was the resist method -- i placed leaves, flowers, etc on the eggs and held that in place with a square of sheer fabric pulled taut and rubber-banded
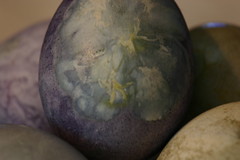
  at the back of the egg (hosery was suggested, but i apparently finally threw out every last pair of my 90s nylons at some point, so in a pinch i used scrap organza, which may actually be the remnant from my wedding veil but i'm not positive about that). i achieved some nice, crisp outlines of azalea blooms, clover leaves, and various tree leaves. the most unexpected result, however, came from a yellow flower i picked along the sidewalk when julie and i took eva for a walk in the wagon. the flower transfered its yellow petal color and red center color onto the blue (red cabbage dyed) egg. it looks almost like a watercolor painting of a flower... what a lovely surprise.
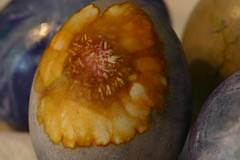 next time, i'll stick to the more successful yellow and red onions, red cabbage (with alum), and maybe beet or hibiscus. i'll also try out a few items that didn't make the cut this year, like blueberries, cranberries, and maybe some spices. i'm trying to think of how to make this a more kid-friendly project -- the dyes work best when on the stove, and even at that, the results are not of the instant-gratification variety. we'll work it out, though, because i find the results far more pleasing than the super-bright PAAS dyes. i considered combining this with my ukranian egg skills (a wax resist batik method), but the natural dyes tend to rub off, so i don't think it would work. in fact, these eggs aren't so great for hiding indoors (tumeric-stained upholstry, anyone?), so eva didn't get to hunt them this year since she was sick and it was 37 degrees outside. all in all, a fun project.